A colorful version of Conway’s Game of Life
Posted by jimblackler on Oct 30, 2014
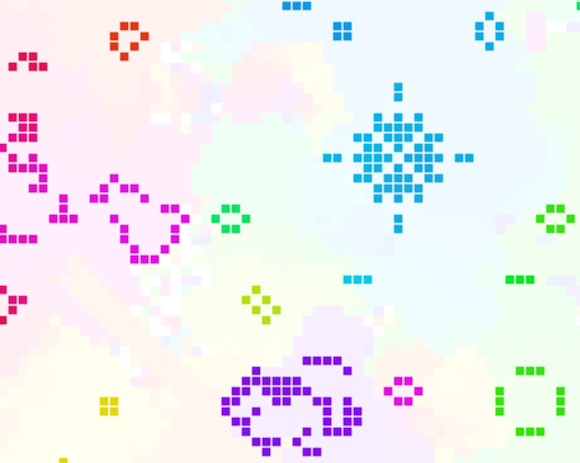
 Here’s a web-based version of Conway’s Game of Life. The rules are the standard recipe but I’ve added colour a color effect to the cells. At startup the cells are assigned colors with random hues. Newly-created cells take the color most similar to the neighbouring cells. When cells die I leave a trace of their color in the vacant cell background.
Adding color makes the simulation more striking, and it also vividly illustrates how local patches of the simulation share common ancestry.
About Life
Conway’s Game of Life is a wonder of mathematics. Invented by mathematician John Conway in the 1970s, it isn’t really a game but a simulation experiment involving squares in a grid (‘cells’) that are either ‘live’ or ‘dead’. Any live cell without two or thee neighboring live cells (including diagonals) becomes a dead cell on the next turn (or ‘generation’). Any dead cell with three neighbouring live cells becomes live on the next generation.
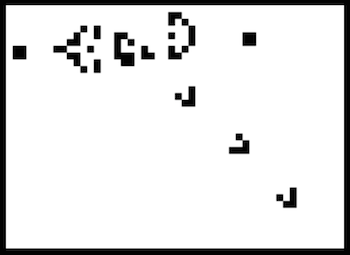
From those very simple rules arises a fascinating array of complex behavior. The menagerie of structures and creatures that can emerge has been studied continuously since Conway invented his game. You can read all about Oscillators, Spaceships, Reflectors and more on LifeWiki and elsewhere. The small library of Life shapes that I include in my simulation were borrowed from the excellent resources on LifeWiki.
Life is one of those ideas that is so simple it begs for variations. For my project I decided to make an implementation that kept the basic Life rules but added colors to the cells.
Demo
My demo is written in JavaScript and uses Canvas for the graphics. You can vary the size of the grid and the update rate with the links at the top of the page, as well as toggle the color effect.
When a cell is newly-created a hue is determined which is formed by summing a 2D vector for each of the three live neighbours’ hues; representing the position on the circumference of a circle where the angle represents the continuous hue value. The hue of the new cell is taken as the angle between the origin and the end of the combined vectors (using Math.atan2). This way an ‘average’ can be obtained that does not tend towards any locality on the color spectrum.
As the simulation is so computationally extensive it can act as a benchmark of sorts between browsers. At the time of writing, Safari on OS X was giving the fastest results.
The source is available on GitHub and has a GNU license.
As always, any comments or enquiries are welcome here or at jimblackler@gmail.com.
A tree diagram (SVG) generation tool in JavaScript
Posted by jimblackler on Oct 16, 2014
This tool creates SVG (Standard Vector Graphics) files to illustrate information structured as a basic tree.
Here I define tree as an ordered graph without loops where every node has zero or one ‘parent’ nodes in the same tree.
It’s a very common structure in computing and will be familiar to most as the structure of folders on a personal computer (as seen in the ‘Unix’ example). It’s also the structure of classes in a single-inheritance object oriented programming language (as seen in the ‘Java’ example).
However lots of real world data can be formatted this way too. For instance an ‘org chart’ of the hierarchy of an organization (because everyone has a boss, apart from the boss of the company).
Project
I wanted to visualize binary search trees to help understand a problem, but I couldn’t find a simple tool to take tree data as text and to output it as a line drawing. I also became interested in the problem of arranging arbitrary tree arrangements neatly, in the original breadthwise order, without overlapping and with sensible spacing between elements. So, I decided to make a tree diagram tool myself.
It may be useful as a tool to generate diagrams of tree structures for documents, presentations and so forth, so I’ve put it online.
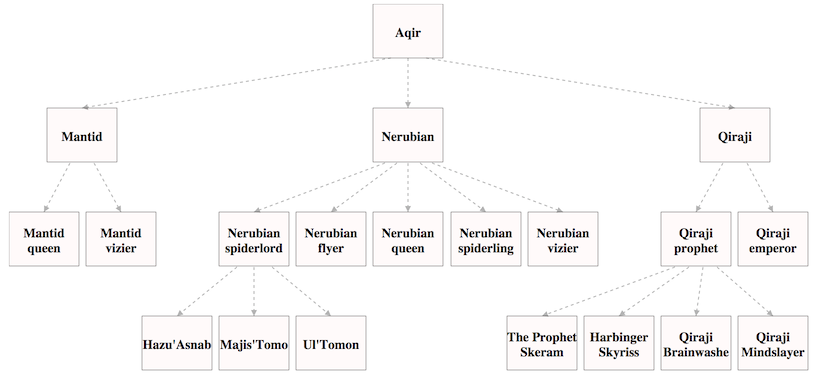
The tool is written in pure JavaScript and creates SVGs that all modern browsers can render. This means the scripts can also be dropped directly into web applications that create tree data on the fly, as a reporting/visualization tool. The source is freely licensed under GPL and placed on GitHub.
Use
To make your own diagrams all you have to do is visit one of the demo pages and edit the data (specified in classic tabular style, e.g:
My Root
  My First Child
    My Grandchild
  My Second Child
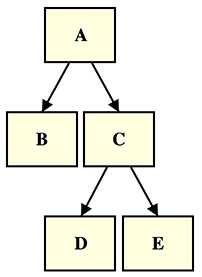
This will generate the diagram below:
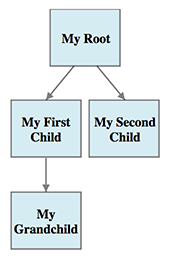
You can edit the options (provided as editable JSON in an edit box on the page) to customize the image in various ways. For instance setting "flipXY": 1 will convert the image to a horizontal diagram.
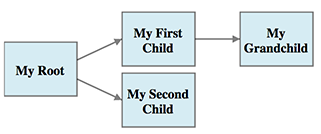
I won’t detail all the options here because it’s designed for experimentation; just play with the values and see what you get. You can change the relative size and margins of the nodes, line spacing in the labels, arrow size and direction and more.
To change the colors or line styles of the nodes and arrows, or the label font size and style, simply edit the CSS data on the page. For instance, editing the CSS as follows…
text {
  text-anchor: middle;
  font-size: x-small;
  fill: white;
  }

rect {
  fill: green;
  stroke: black;
  stroke-width: 0;
  }
.. would result in this diagram: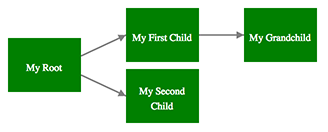
Method
The diagram generator has the task of building diagrams that have elements positioned and spaced sensibly, without nodes or lines overlapping, and making the best use of available space (the nominated rectangle the diagram may occupy). Element positions need to be considered as a whole, as repositioning any element will have a knock-on effect on any other elements it might now overlap, free space to better position, and so on.
After experimentation I developed a relatively simple method with all nodes having their vertical position fixed in a level based on the distance to their tree root. The horizontal positions are in order of the breath order of the nodes in the tree, but other than that, they are allowed to move horizontally. The method relies on identifying the one level which has least potential to be repositioned, laying this out with regular spacing and fitting the other rows around it.
Relative values are given in the options for the widths of nodes and the spaces between sibling nodes (nodes that share the same parent) and cousin nodes (nodes that are the same distance from their roots but don’t share the same parent).
-
The tree structure is converted into an array of levels to be displayed in rows.
-
Each level is measured for its minimum width given the spacing ratios in the
options. -
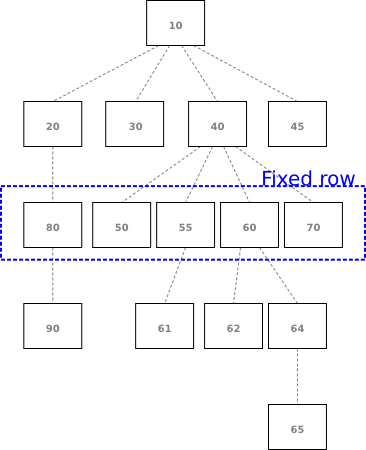
The row that occupies the most screen width is nominated as the fixed row.
-
All rows between the fixed row up to an including the root are now considered in turn. For nodes that have children (in the level below) they are given an ideal horizontal position as the average (horizontally) of their children.
-
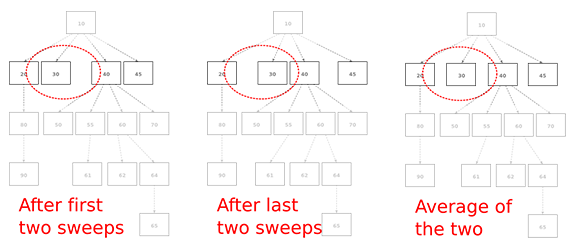
A ‘sweep’ process then travels left to right across the nodes and forcing the rightmost node of each considered pair further right to ensure that it is not positioned too closely to its predecessor. As this may push nodes outside the diagram area, a return sweep performs the same operation from right to left with the rightmost element constrained to the available horizontal space.
-
These positions won’t result in overlapping elements. However because of the way the sweep operates, elements will often result in nodes positioned immediately to the right of neighbours when there is a large gap remaining that could be occupied. In order to have nodes occupy the central position in the available space, a third and fourth sweep are performed in mirror-image of the first two (right to left then left to right). Naturally after sweep four the elements are often positioned immediately to the left of neighbours. So, the positions after sweep two and sweep four are averaged to determine the final position of the nodes; non- overlapping and evenly positioned in the available space.
- A similar operation is performed on all the rows below the fixed row traveling downwards. On this occasion, the ideal horizontal position for the nodes is an even distribution of children underneath, with the group centered on their parent node.
Contact
I hope some find the tool useful or interesting. Check out the site and as ever, feel free to contact me on the comments or at jimblackler@gmail.com, or make requests via the GitHub page.
Plus Comments; a new Chrome extension
Posted by jimblackler on Feb 25, 2012
Often I’m browsing the web, and I’m curious as to what others have thought about the article’s I’m reading. Many pages have comment sections but these are usually mostly occupied by that site’s regulars rather than a cross-section of internet users in general. For a while I’ve wanted to make an app that lets you view comments about an article that have originated elsewhere.
So here’s my third Chrome app (after the solitaire game, and an earlier web-dev tool URLGuide, thatI didn’t blog about). It’s an extension that lets you see which Google+ users have shared pages you browse to. You can read the comments on the shares and their replies, and there’s nothing stopping you from joining in the conversation, or circling the other users who may share your interests.
As you browse the web, an icon will appear in your Chrome address bar linking you to discussion between Google+ users about that page. If the icon is red it means it’s a ‘hot topic’ with a number of replies from G+ users.
Like all Chrome apps it’s JavaScript and HTML. It’s pretty standard stuff; you can view the source on the extension using developer mode and it’s not encrypted. I’ve taken care over privacy. The app uses a direct, secure connection to the Google+ API; this can’t be eavesdropped, but I also take care to only make queries about public sites.
I hope you enjoy the extension. You can find it here.
HTML5 Maze Generator Demo
Posted by jimblackler on Jan 4, 2012
This next project is a bit of fun for the new year. It’s a maze generator written with JavaScript/HTML5 Canvas. I was thinking about possible algorithms to generate classic maze puzzles and thought it might be interesting to write one.
The algorithm is simple at heart. It’s from a class of puzzle generators that work in conjunction with a solver algorithm; changing the puzzle step by step while continuously trying to solve it to see if it’s still viable.
Method
The maze generator starts with a blank grid. One in four squares are blocked with base ‘columns’. It keeps a list in memory of all the squares on the grid that could be filled in, the ‘blockable’ squares. It then solves the grid in its current state by a classic flood-fill algorithm.
In the solve operation every square that forms part of the shortest path (or joint shortest paths) from top left to bottom right is detected (this are the squares painted as red in the demo visualizer). Because in the early phases there are many equally good routes, it is typical that much of the maze can be painted red.
These squares are then searched in random order to find one that is still in the ‘blockable’ list. It’s removed from the list, the grid square is blocked, and the solver re-run. If the solver reports that every blank square on the grid is no longer accessible from every other square, that piece cannot be blocked without breaking the puzzle. We ‘unblock’ it, but we don’t put it back in the list because it can *never* be blocked without breaking the puzzle. If the solver reports the puzzle is still universally accessible, the current grid is rendered to the screen and the solver repeats.
When there are no squares remaining from the path that are in the blockable list, the algorithm just attempts to block any random squares in the list (with the same accessibility checks) until nothing remains in that list. Then the puzzle is complete.
The reason that squares along the current best route are considered first is that in doing so the length of the solution path can only be increased. Without this constraint virtually every maze ends up with a solution that is too short and almost always forms a diagonal path roughly direct from top left to bottom right.
Please take a look at the demo. Different sized puzzles can be selected (you can customize the values if you’d like to edit the URL parameters). When the puzzle is complete the red solution indicator can be turned on and off. If you’d like to look at the source you can do so in Chrome Web Developer tools or similar tools in other browsers.
Offline Solitaire, an HTML5 browser application and Chrome application.
Posted by jimblackler on Dec 17, 2011
Click here for the Chrome application
Does the world really need yet another implementation of Solitaire for the browser? Yes, absolutely!
When I acquired a Chromebook recently I looked for Solitaire Chrome apps (my gaming tastes aren’t particularly sophisticated) only to be disappointed by over-presented apps heavy in Flash and Ad-laden.
I just wanted an implementation of regular Klondike Solitaire that matched the simplicity of the old Windows-bundled version. The one played for years by bored office workers worldwide before the internet took over as principal time-wasting activity.
Also I wanted one that would work offline (when user have no internet connection). Solitaire is an ideal activity on the plane or train.
Another motivation was simply that I felt like writing a card game having never developed one before. Also I wanted to understand how feasible the idea of offline browser applications is.
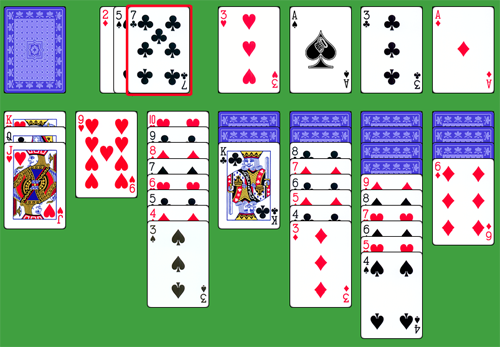
Here it is, a minimal implementation of classic Klondike Solitaire to be played in the browser, developed with HTML5 technology including JavaScript. It’s also presented as a working Chrome application, that can be installed to Chrome with just two clicks.
It was developed using Eclipse and Chrome Developer Tools. Cards were adapted in Photoshop and Inkscape from public domain and Creative Commons resources.
Click here for the Chrome application
Photos Calendar; an extension for Google Calendar using Java App Engine and Picasa API
Posted by jimblackler on Nov 6, 2011
A few years ago there was a lot of talk about web ‘mash ups’; using web APIs to combine web applications.
Photos Calendar is an old-school mash up that brings together Google+, Picasa and Google Calendar, all using a Java web app running on Google App Engine.
To try it out click here. Or read on for the inspiration for the app, and how it was built.
Concept
Now that Android enables instant upload of photos to the cloud, I’ve been sharing lots of pictures taken with my phone onto Google+. Also, as I’ve used Picasa Web Albums for some time, the cloud now has quite a bit of my photo history.
Another web app I’ve been using for years is Google Calendar. It occurred to me that it would be interesting to see links to my cloud-based photos appearing on Google Calendar, in the form of events placed at the time the pictures were taken. In some cases these would appear next to the original appointment from the event.
As well as making the task of finding particular pictures easier, it also may help you to recall what you were doing on a particular day by checking your calendar. But above all it would simply add an interesting new way of browsing your existing data.
Development
I believed the idea was practical. The Picasa service is the storage engine for Google+ picture posts, and it has a public API. Also, Google Calendar has an API and other ways that calendar data can be imported to the app.
In fact, developing the app wasn’t particularly hard. The toughest bits were handling the Picasa API’s authentication mechanism via App Engine, fixing ambiguities with the time zone on photo time stamps, and creating the pages to explain to users what to expect (since the app has no user interface of its own).
App Engine
Ideally I wanted the app to run on Google App Engine, because this service provides a scalable and robust way of serving simple apps.
I considered the best way to get the events to appear on Google Calendar. I could have used Calendar’s gData API to import events to users’ existing calendars. However this approach would have modified the main event calendar rather than adding an extra layer, and would have created the need to synchronize data on a schedule.
It’s much easier to serve an iCal calendar on demand and have users add this to their calendars as an extra layer. iCal is the name of the built-in calendar app on Macs, and it’s format, of the same name, is the the main format used by Google Calendar to import calendars.
Fortunately App Engine allows virtually any content to be served by implementing the HttpServlet class. If an App Engine app can serve iCal format calendar data, extra calendar data can simply be imported into Google Calendar by adding a URL. This means that for most users the app can be set up with just a few clicks. Users can also toggle display of the photos calendar on and off as they see fit.
iCal4j
I discovered that the excellent iCal4j library could work on App Engine. Not all Java libraries will work on App Engine ‘out of the box’ because of restrictions imposed by the platform, such as a lack of threading support. iCal4j allows Java apps to create data in the iCal format. From the developer’s perspective, adding events to an iCal4j calendar is pretty simple.
If the calendar service is also a client to the Picasa API, the two services can be bridged. The servlet queries the API, iterates the results, and spits out a calendar with one event per photo.
Authentication
So how to enable the servlet to make API queries? The problem is, to serve a user’s private data Picasa requires an authentication token to be sent with every query. This token is obtained as part of an authentication process where the user is sent to the Google website in order to agree to give the application access to his or her data.
If the iCal service is to make Picasa queries then it will need this token. But as the service is to serve many users, how is it to know which token to use to serve requests? The answer is to have the calendar URI carry the token, meaning that the service need stores no information about each user. The information can be carried in the URL encoded in a ‘data’ parameter. The URL is prepared by the servlet that receives the data following the authentication request, for each user, embedded with all information required to create the calendar layer for each user.
However it is necessary for security reasons to encrypt the authentication token. Otherwise, anyone who can access the calendar URL could also reveal the Picasa authentication token which could allow them to make any Picasa API calls with full permissions granted by the user. If it is encrypted with a key private to the app this attack vector is heavily reduced. There is no way to avoid discovery of the calendar URL allowing access to the photos calendar layer to anyone with that URI, but there are no way that these URLs will be revealed to outsiders in normal use of the app.
Time Stamps
It’s crucial for this app that the pictures events are created on the correct date and times, since that’s all the app does! It’s easy to get the timestamp the pictures were created, Picasa serves this information from the camera EXIF (picture metadata) data accompanying the picture. The problem is that these time stamps are local to the time they were taken, but no time zone is given. This is a big problem when combined with the fact that iCal calendars imported into Google Calendar have to be given an explicit time zone. If I don’t get the combination right, pictures could appear up to 24 hours removed from the actual time the picture was taken.
Using location data from the EXIF might offer one solution, but location data is usually removed from the pictures at upload time for security reasons. I have no option but to assume that all pictures are taken in the time zone of the user.
It’s actually quite difficult to get the time zone of the current user, even though the app has their Picasa credentials. The information does not appear to be available through the general Google Account, but there is a roundabout way of getting it through the Calendar API (by looking at the timezone on the default calendar). However I didn’t want the time overhead of using this API, or to ask for another permission that users may be dubious about, and more tokens that would need to be carried on the URL.
My fallback was to use a technique I’d employed on my Events Clock project. It is possible to use JavaScript to make an educated guess as to the user’s current time zone based on the offset applied to the Date object.
I used an excellent snippet from the Redfin Developer’s Blog to detect the time zone. This, being JavaScript, happens on the client side, but the data is stored in a cookie for later retrieval on the server side following successful authentication of the Picasa API. It’s an approximation, and it relies on the assumption that the user’s browser timezone is the same as their camera timezone, but it got good results in my tests.
You can see the app for yourself here: https://photoscalendar.appspot.com
The app is free software under a GPL license. The source can be found here https://github.com/jimblackler/PhotosCalendar
‘Big Ben’ animated SVG demo
Posted by jimblackler on Apr 12, 2011
Here’s the results of an experiment into building dynamic SVG for direct viewing in web browsers. If you want to see the animations just click here or here.

The hands animate and the time on the clock should be correct for your time zone!
SVG stands for Scalable Vector Graphics, and is an advanced image format that has existed for over ten years. However now it is really coming into its own as almost all the modern desktop browsers have the ability to display SVG directly in pages. What makes the technology really interesting is that SVGs can contain JavaScripts that manipulate the images in a very similar way to dynamic HTML. This means a variety of interesting visual applications are possible all available from a single click link; and not an ounce of Flash in sight.
Building on from the fortune cookie generator I build last month, I wanted to build in interesting new SVG demo to showcase what you might call ‘live Photoshopping’; generation of custom photo realistic images. It seems traditional to make a clock when learning SVG, so I played on this idea a little with a plan for a photorealistic, animated image of Big Ben. The hands were to move in real time and show the correct time for the user’s browser.
Big Ben (more pedantically titled the Clock Tower at the Palace of Westminster) is one of the most famous clocks in the world. Its an iconic symbol of my home city London; so what better clock to chose for the animation.
As often with these projects the job began with a search on Flikr for high quality images with licenses permitting remixing. I found two great images, flickr.com/deerhake11/3903926815 flickr.com/aldaron/536362686 Many thanks guys for the great images and for putting Creative Commons licenses on them.

 Next step was to fire up PhotoShop and begin the process of removing the clock hands and shadows. Before and after pictures are here. Then the same tool had to be employed to recreate the hands as assets that could be overlaid and rotated to show the correct time.
All done, I used Inkscape to help me line up all the images and try out various filter effects to recreate a subtle shadow on the clock hands. Once I was happy with the results I built up my own SVG file and added the scripts to animate the clock hands.
One problem that needed solving was that the animation shouldn’t be shown as its child images were being downloaded into the browser. This resulted in a weird effect where the user would see the image being built up from the constituent elements and the illusion would be spoiled from the beginning. Sadly I couldn’t find an SVG equivalent of window.onload to delay code execution until the whole image was ready. My workaround was to include the child images as base64 encoded inlined data which ensured as a side effect that all assets would be available at the same time. There may be better workarounds if I had the inclination to investigate.
Because the drop shadow effect uses SVG filters, the image won’t look as realistic on browsers that don’t have full SVG support. These include Safari and Internet Explorer 9. Earlier version of Internet Explorer don’t support SVG at all, nor, weirdly, does the Android web browser.
Here are both links again.
Fortune Cookie Image Generator
Posted by jimblackler on Mar 9, 2011
I’ve always enjoyed playing with meme image creation tools such as saysit.com and many others. When I couldn’t find a creation tool to make fake fortune cookie images I decided to build my own. It would also give me a chance to play with some HTML5 technology I’ve been looking at, specifically SVG images.
The generator quite simply builds an image of a fortune cookie with a custom slogan provided by the user. You’ll find it at http://jim.ignitiondomain.com/fc
How I built it

Once I found a suitable fortune cookie image on Flikr (an excellent image from Flikr user cpstorm), and checked it had the right license (Creative Commons for modification) I merely had to remove the existing slogan on the image. Easy right? As it happens, Photoshop’s Content Aware Removal tool does a brilliant job at this kind of thing, and the operation barely took ten minutes.
I then used Inkscape to make an SVG file that featured the image, plus a template for the replacement text. This involved picking a suitable font, laying down a path for the text based on the existing slogan, and carefully selecting a filter to get the ‘blotter paper’ look. I was pretty pleased with the results, if feel the results are almost photorealistic.
I simplified the SVG file as much as possible (Inkscape is excellent but it does include some redundant data that can be removed by hand).
Next step was to host the SVG image in a generator html page, where the user could supply text that would be patched into the SVG. This worked great; on Chrome, Firefox and Opera. Safari doesn’t support filters so the blotter-paper text effect didn’t work. IE doesn’t support SVG at all right now (although it is coming in the next major release)
So to support these browsers, and to allow the image to be saved as a .jpg file, I really needed the ability to generate the JPGs on the server side.
It turns out this is very hard. I looked at ImageMagick which my web host supports. Unfortunately none of ImageMagick’s supported SVG engines has text paths, so the effect would be impossible.
In the end I discovered Batik which is a superb Java-based SVG engine with transcoding abilities. The only problem is my current web host doesn’t support Java, and another option Google App Engine wouldn’t work because Batik uses multiple threads and App Engine does not allow that.
I looked at options and found an inexpensive Java host just for this application, and purchased a three year package. This allows me to support all browsers, but use client rendering on Chrome, Firefox and Opera for a better experience. The Java servlet uses Batik to generate JPGs from the same SVG used to build the images in browsers, with the custom slogan passed on URL parameters.
I also wanted to provide a great image hotlinking service that was as easy to use as possible. It wouldn’t be ideal to try to allow hotlinking on the generator site for a number of reasons, but since there are tons of image hosting sites out there for this kind of thing, the best thing would be to integrate with one of those. I’d seen something called ‘anonymous sideloading’ from an image site called imgur.com, and this proved to be ideal. With one click I can load the images directly onto imgur via users’s browsers. The only tough bit was the restrictions that imager was putting on characters in the source image URL; specifically imgur’s side loader didn’t like the & symbol or spaces. I needed to rejig the generator to take all the parameters as a single Base64 encoded JSON object. This made the URLs imgur friendly and the image hosting setup works a charm.
Hope you enjoy the generator at http://jim.ignitiondomain.com/fc!
A new quiz puzzle game: Movie Triangles
Posted by jimblackler on Jan 13, 2011

Movie Triangles is a puzzle game that combines a movie knowledge quiz with a tile puzzle. The objective is to fill a 16 or 25 piece grid with triangles containing movie and actor names. In the winning grid, all triangles with movies will border their starring actors.
The game includes a number of puzzles of varying difficulty and featuring movies from different eras.

To play the game click here.
And if you want to know how the game was developed, read on.
Development
I’ve long thought that the network of relationships between Wikipedia articles is a fascinating area and ripe for adaptation into a game. I originally contemplated a game based on a hexagon grid where the player would position hexagons labeled with Wikipedia articles. The objective would be to place the hexagons next to those labeled with names of related articles.
However this idea lacked clear rules. It’s not clear to the player *why* the articles would be linked, so it would be unreasonable for the game to seek a right-or-wrong answer. So I looked for Wikipedia topics with clear formal links. I thought about players in sports teams, neighboring countries, musicians in bands, and other ideas.
However the stand-out candidate for this treatment is movies and the actors who star in them. There is a huge amount of data to be mined, both on movies and actors. The data is bilateral, actors link to movies in good quantity and vice versa. The topic is interesting for lots of people and relatively international. It’s a great topic for a game.
As I explored the idea and worked on prototype game grids it became clear that a hexagon structure with six connections per piece would prove unworkable. It would most likely be impossible to create working puzzles, because the demands of having to find six links per movie or actor. Triangles, with just three links (fewer for those at the edge) seemed much more feasible. So the design for Movie Triangles was born.
Scraper, Solver and Game.
The software for the game is divided into three parts, each of which passes data to the next component along.
Crawler/Scraper
The crawler/scraper is based on my Quizipedia scraper. Written in Java it downloads articles from Wikipedia onto my local PC. An SGML parser is used to load the article DOMs, and XPATH queries are used to pull out data, which is then loaded into a local MySQL database. Using a separate database helps solve problems caused by the large quantity of data (such as serialization) and allows the process to easily be interrupted and restarted.
The starting point for the crawl is an article on Wikipedia that is a central list of lists of movies elsewhere on Wikipedia. A ‘list of lists’. Crawling just a depth of two from that hub article appears to cast a net that includes virtually every movie article on the site.
Once the pages are loaded and processed they are scanned to see if they are movie articles that can be analyzed for inclusion into the database. Thanks to the diligent work of Wikipedia editors, movie articles consistently have a sidebar that contains structured data about the topic. For my purposes there are two pieces of data that are particularly useful. The first is the ‘Starring’ field that contains links to the starring actors of the movie. Since these contain Wikipedia URLs this provides disambiguation, solving a problem where actors who shared the same name could be confused. Similarly, inbound links to the movies are analysed. Also I use the anchor text from links to provide a cleaner, shorter name than is often provided by the article heading.
The other very useful field is ‘Release date(s)’ which can be processed with a regular expression to discover a release year number for the movie. This is useful data for the game to help players identify a movie more effectively than the movie name alone would.
It is also useful for verifying and article is actually about a movie. I have also observed that if an article has both ‘Starring’ and ‘Release date(s)’ fields in its information sidebar it is almost certainly an article about a movie rather than something else. This is a very effective filter to ensure a 99% clean data source.
It takes only about an hour of running the crawler before a database of about 12,000 movies and actors has been built up. Then the baton is passed to the game builder which begins the process of creating the game puzzle grids.

Builder
The builder is another Java application which loads the movie and actor data from the local SQL database into memory. It then attempts to construct completed, valid board positions, selecting from all the actor / movie combinations in the database. Firstly a single tile is ‘seeded’ with a particular movie. Then the algorithm attempts to find the valid board positions where the least famous movie or actor is as famous as possible.
The reasoning behind the fame requirement is to stop puzzles from being filled with highly obscure movies or actors. If the algorithm used any actor / movie combinations that made the grid fit, it is unlikely that the average player would be able to guess even 20% correctly. It is the nature of Wikipedia that it is highly extensive, but this extensiveness works against the aims of a trivia game.
What is needed is some way to score the fame of an article subject. When I developed Quizipedia I experimented with various signals such as the number of inbound links to the article. Eventually I discovered the surprising fact that the length of the article is closely correlated to how likely the average person is to have heard of the article topic. It is an artifact of the fact that the motivating factor for Wikipedia editors to work on an article is also correlated to the fame of the topic. Longer articles mean more famous topics. An relatively obscure actor is likely to have a short article.
The actual building algorithm is pretty involved so I won’t detail it in full. The short version is there is a recursive method that takes a position which, for each slot in the grid, has a set of any possible actor/movie that will fit into each slot (this is calculated with iterations of set operations beginning with the currently fixed slots). The slot with the fewest possibilities is selected, the tile is fixed with each possibility is in turn and the method re-invoked recursively until the best solution is found.
The builder also creates custom tile images for the game in custom PNG format, with the movie or actor text positioned to fit the triangle using the largest font possible.
Game
Having come up with the triangle grid idea, I needed to make the actual puzzle work as a computer game. I went through several iterations, testing on friends before coming up with the design you see today. One main question was how to tell the player if their guesses are correct or not. I wanted the player to be able to move the tiles around freely before submitting their guess. I implemented a ‘check grid’ button that would tell the player if they had it right. Having this only appear when the whole grid is filled helps keep the look simple and therefore inviting. Returning only the invalid tiles allows people to correct their grids and keeps the difficulty manageable. I record and report the number of times the check grid button is used by the player to reward players who found the solution on the first event. Combined with fixing the correct tiles and not allowing players to place tiles in locations already revealed as invalid, it should be possible to solve the grids by trial and error. This lowers frustration levels as players can usually finish grids with a number of attempts.

One game element that is controversial with my testers is the tile borders. Here I use a visual clue to show which positions tiles can be found in. This reduces dramatically (particularly with 16 piece puzzles) the number of slots a tile could potentially occupy. People sometimes say this feels like cheating. Certainly it does reduce the simplicity of the puzzle which is regrettable. However in tests I have found puzzles without this aid to be considerably more difficult, to the point of bafflement and frustration. The problem is you may know which actor starred in which movie, but there would still be a large number of tiles both could potentially occupy; maybe anywhere on the grid. If you have a 80% knowledge of the films and actors it can take several minutes of grinding through the possible orientations of the tiles to find the right one. I believe if I had published the puzzle in this way it would only appeal to an elite of puzzle and trivia solvers, who would have the time and inclination to spend the time to work through all the possibilities. Adding the borders means most of the time spent on the game is in thinking about the trivia content rather than wrestling with complex geometric logic. It also allows some interesting logical clues that let you fill in the gaps of your knowledge.
I wanted the game to present an inviting, clean layout to the player. The game always completes the corner grid pieces to invite the player to get started straight away; each corner piece has just one neighbour to find.
I am pretty happy with Movie Triangles. I hope you enjoy it too.
Quizipedia. A web quiz game using Wikipedia content
Posted by jimblackler on Nov 11, 2009
Wikipedia is a fantastic resource. As well as a great encyclopedia, it is a gold mine of information placed in an organized structure. I’ve long been interested in how this could be exploited for applications beyond the encyclopedia; something which is allowed for in site’s Free Documentation license.
It seemed to me that a general knowledge quiz would be a superb alternative use for the data, so I set about to make a Wikipedia quiz, or ‘Quizipedia’. Mining Wikipedia would result in an array of questions from geography, history, entertainment, sports and science; in fact across all areas of human endeavor and study across the globe.
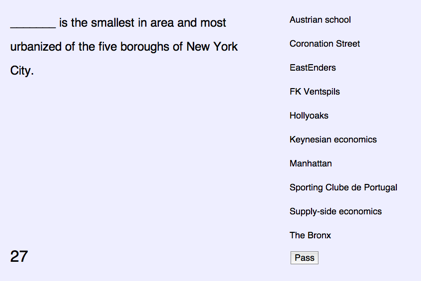
I decided the game would work best in a multiple choice format. The design I chose was to challenge the player to match ten random article names (on the left) against the subject description from the article (on the right). The first sentence of a Wikipedia article usually succinctly describes the subject of the article making it ideal for a quiz question. The player has sixty seconds to complete the task. The player is permitted to ‘pass’ a question, in which case the next question in rotation is shown.
The pass mechanism is in part because the scraper is not perfect. I’d like to think it’s about 90% perfect, but weird or unfair questions can slip through. Allowing the player to pass these questions until they can be answered by elimination means the quiz is not ruined.
The game is here and it is ready to play. However if you’d like to read about how I built it, read on.
There are two parts to the web game. There is a client served using a GWT application served on Google App Engine. This requires a database of questions to work from. Selecting the best questions and effectively scraping them from Wikipedia was the tough part.
Scraper
Using the techniques I worked out for my earlier article I wrote a new scraper to crawl pages from Wikipedia. This was a Java client running on my workstation making HTTP requests and using an sgml processor and XPATH queries to pull out the relevant text. The rate of crawling is no more than 30 articles a minute, which is unlikely to be interpreted as an attack by the web server.
Each page crawl extracts links from the article to used by further searches. It also extracts the opening sentence. All we have to do is strip the name of the article, leaving the reader to guess what is being referred to.
For instance after extraction and stripping bracketed text, the first sentence of the article about the city of Paris reads:
Paris is the capital of France and the country's most populous city.
Simply finding the subject of the article in the opening text, and ‘blanking’ it with underscores can create a feasible question to describe the subject. In this case
______ is the capital of France and the country's most populous city.
The blanking process cannot always be completed. This is because the subject name does not always appear in full in the opening sentence. This means only about 60% of articles can be processed in this way.
In order to maximize the chances of being able to successfully remove the article name from the opening sentence I consider all text strings used to link the article found in the crawl so far. For instance, an article may be linked with the term “United States” or “United States of America”.
Obscurity
One problem I encountered early on was that there is a surprising number of articles on very obscure topics to be found on Wikipedia. Follow the ‘random article’ link and you’ll get a good idea of this. I was happy for the quiz to be about random topics from general knowledge. However to give players a fighting chance they shouldn’t be on topics that they had a reasonable chance of having heard of.
A good signal is the number of ingoing links to the article, and also the number of outgoing links. The latter is the case because topics on popular subjects tend to be well-developed by many editors, and this translates into a lot of links going out. Fortunately both these metrics are available to me during the crawl, allowing me to discard smaller or not well-linked articles.
Alternatives
The multiple choice aspect to the game demands feasible alternatives to each answer. Otherwise it can be obvious which is the correct answer by applying a process of elimination. For instance if the question pertains to a country with particular borders and there is only one country on the list of alternative answers, the correct answer is obvious. I wanted to include in each quiz a number of subjects that could reasonably be confused without close consideration of the question. So if the answer was ‘Paris’, the user may also be presented with ‘Lyon’ or ‘Brussels’.
This was the most challenging part of the scraping process. I investigated a number of ways to discover for a given page typical alternative answers that could be presented. These included sharing a large proportion of incoming or outgoing links. The problem with this is the computation required to match link fingerprints globally – just a few hours of scraping accumulates 5 million links between pages. Fortunately a really good signal turned out to be when the links appear together in the same lists of tables in Wikipedia. There are a surprising number of lists to be found in Wikipedia articles, and they very frequently group articles together of similar type. Identifying where articles appear together in lists and ensuring it is likely that they will be placed together in quizzes makes the game tougher and hopefully more compelling.
That’s a brief description on how I built Quizipedia. I hope you enjoy the game, and if you have observations or feedback please leave it on the comments of this page.
