Events Clock: A Google Calendar Visualisation with iGoogle capability. Written in ActionScript (Flash), Java (Google App Engine) and JavaScript
Posted by jimblackler on Apr 26, 2009
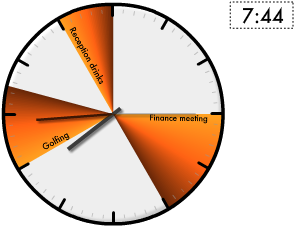
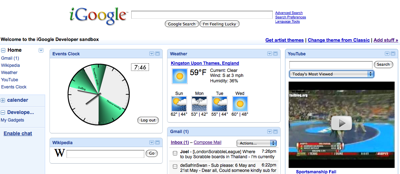
Events Clock is an experimental visualisation for your Google Calendar. It shows your upcoming events as coloured slices around a traditional clock face.
The visualisation shows where the hour hand on the clock will be when each event is in progress. The calendars shhown will match the your existing selection of visible Google Calendars. The colours are taken from the colour you have selected for each Google Calendar, with the exception of events in the past, which are shown in grey.
If there is any doubt as to where the 12 hour period begins and ends, a dotted line is shown. Clicking on the events will send you to the page on google.com/calendar for that event.
Links
To view Events Clock as a stand alone web page, click here. If you don’t use Google Calendar, or don’t have any events in your calendar over the next ten hours or so, click here for a demo.
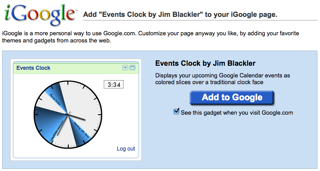
To add Events Clock as a gadget on your iGoogle page, click here.
Concept
The idea came from the desire to see at a glance what I was supposed to be doing over the course of the day. The original idea was for a mobile phone application. However, once I’d developed a Flash prototype, I discovered iGoogle Gadgets, and the two seemed an ideal fit. I adapted the visual design for the smaller area and it seemed to work well.
As an iGoogle gadget, you’ll see an instant pictorial representation of your day’s events whenever you navigate to your Google homepage.
Accessing Google Calendar data
Events Clock uses a method called AuthSub. This enables it to get access to your Google Calendar data, with no possibility of access to anything else from your Google account. When you click to grant access, a new browser window is opened pointing at a page on Google.com. Here you can allow access to Events Clock. If you have to enter any passwords you are informing Google.com. My site will never see this information. It can’t even see your user name, or email address. All it gets is a token from Google that allows it access to your calendar data. This token is stored, encrypted, as a cookie in your browser.
Note that the Google authorisation screen warns that Events Clock has not been configured for secure access. I have in fact developed secured access, but a possible bug in App Engine appears to be blocking the secure authorisation requests.
App Engine
I used Google’s new cloud computing platform App Engine to host Events Clock. This is possible now that App Engine supports Java. This allows my app to benefit from the scalable, and of course free, hosting. The development went reasonably smoothly, although there were some teething problems with the Google Data access.
Feedback
Events Clock is a concept application, so I’d be very interested to hear your feedback, or reports of technical issues. Please leave comments on here on this blog.
Modular JavaScript enabled user controls in ASP.NET 2.0
Posted by jimblackler on Dec 23, 2007
ASP.NET is great at separating design and code elements on the server side. This extends to a powerful yet simple way of adding your own custom controls to your ASP.NET websites.
It provides a great method to connect HTML elements in an .ascx and back end server code in a .cs file. This approach is quick to get going and has long term scalability too. However, on the web today, developers will want to have the option of client side dynamic code too, in the form of JavaScript elements to add to the control.
Microsoft’s suggestions are useful but only suitable for simple applications such as mouseover effects. This is because they tell you how to add isolated fragments of JavaScript to DOM elements. I wanted a single JavaScript class that had permanent links to DOM elements.
Lately they also provide Ajax tools for ASP.NET, and a framework of Ajax controls. There are some nice controls with these tools. However even with everything installed, what you don’t get is an way of adding your own JavaScript enabled custom controls which is as easy as adding a Web User Control from the Add New Item wizard. I was expecting to see a pattern that simply provided a client side .js file to complement the server side .cs and .ascx files. The AJAX tools seem rather over-complex compared to vanilla ASP.NET 2.0, and worse still, this approach requires .dlls to be installed on the server side. I had to telephone my host to ask them to add the components.
I’ll explain the simpler system I have developed. My aims were:
- To neatly include all the JavaScript in a .js file, containing a parallel JavaScript class for the control.
- To give the JavaScript part access to DOM elements set up in the .ascx (server side) part of the control (either runat=”client” elements type or elements created with runat=”server” controls).
- To give the JavaScript part access to the attributes set on the server side of the control.
- To allow unique HTML IDs, so that there can be more than one control of that type per page, with each control operating independently.
My method enables links not only between server and client sides of a user control, but between controls and their parent elements on the client side (just as could be done on the server side). Think of it as “client-side code behind”.
How it works
- An ASP.NET control is set up in the usual way with code behind which adds the .ascx and .ascx.cs files to the project.
- The developer adds a .ascx.js file to the project for the client-side components, with a matching name.
- function TrackBar(clientID, minimum, maximum, smallChange, barPixelWidth)
- {
- //....
- }
- The developer adds two pieces of JavaScript to the .ascx. Firstly, a client-side include to the .ascx.js script:
- <script type="text/javascript" src="TrackBar.ascx.js"></script>
Below that, a script to create a new instance of the JavaScript object with the expected parameters detailed in the previous step.
- <script type="text/javascript">
- <%=ID%>= new TrackBar('<%=ClientID%>', <%=Minimum%>, <%=Maximum%>, <%=SmallChange%>, <%=BarPixelWidth%>);
- </script>
The “<%=ID%> =” before the ‘new’ creates JavaScript code that sets a variable that contains the JavaScript object associated with the control that is named the same as the server side ID for the control. This could allow JavaScript in the parent page to interact with the control object of the child control.
This contains a single class wrapped with a single function of the same name, and taking as parameters the client ID of the the control, and any properties that the JavaScript object requires to receive from the server-side part. e.g:
The ClientID allows the JavaScript to have access to the DOM relating to its specific instance using the getElementById() function. This is because is possible to predict client IDs of child DOM elements by using the control’s own parent ID. For instance a div declared with <div runat=”server” id=”content”> in a control with client ID “myControl1” will have the client ID “myControl1_content”. In code this could be obtained with getElementByID(clientID + “_content”);
The use of runat=”server” is necessary because although a static client ID could be provided, this would not have a name unique to the page, and would therefore not allow more than one control of that type per form or parent control.
Example
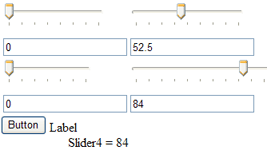
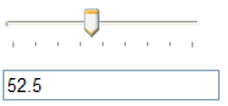
An example with an online demo and full source is presented here. I’ve developed a TrackBar control for ASP.NET similar to the control in Windows Forms. This control is for number entry by a user viewing a web page. It presents a number as a text box, but if the user has JavaScript enabled it also shows a visual slider that can be manipulated with the mouse. The effect on the value can be seen in real time.
The control changes the text in the TextBox which gives a return path of data to the server side. An example of this can be seen in the code in the Default.aspx.cs file.
In addition, a callback can be added to an instance of a TrackBar control on the client (JavaScript) side. An example of this can be seen in the code in Default.ascx.js, where the position and content of a text fragment is changed in real time as the slider is altered.
Grid rotate puzzle (Flash CS /ActionScript 3.0 for Flash Player 9)
Posted by jimblackler on Nov 13, 2007
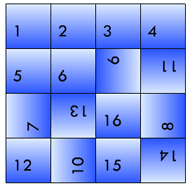
I’ve written a simple puzzle game based on an idea I’ve been knocking around. The idea is inspired by slide puzzles and the Rubik’s Cube. Also a lesser-known puzzle called the Rubik’s Clock that I loved as a child.
The objective is to return a grid of numbers to its original form by rotating individual 2 x 2 square bocks by 90 degrees. Hard to explain but give it a go, you’ll work it out quickly I’m sure
The grid starts out straight. You can scramble it yourself or hit the ‘Spin’ button and have it done for you (hit it again to stop the scrambling). You can also experiment with using the slider to create grids of different sizes.
It is worth pointing out something though. When I came up with the idea I thought that it would be about as difficult to complete as a standard slide puzzle. Wrong. It seems very, very difficult. People tend to get very stuck on the last row. In fact, based on a day’s play testing, nobody has yet even completed a 3 x 3 grid.
So give it a try, you could be the first.
Safely adding events to DOM elements in Javascript for IE, Firefox, Opera and Safari
Posted by jimblackler on Sep 29, 2007
Recently I looked into some reported problems with my word game site Qindar.net and the Safari browser. This was a bit easier for me since Apple released a Windows version of Safari (which, albeit arguably surplus to requirements, is actually a very nice, usable browser on Windows).I discovered that the technique I was using to work out which method of event attachment to use was flawed and was failing for Safari. So I refined it slightly to fix the problem.
The problem is that Javascript on Firefox, Opera and Safari support the “W3C DOM Level 2 event binding mechanism”, which uses a function on DOM elements called addEventListener. Internet Explorer however uses a technique that was apparently from before that particular standard was drawn up, employing a function called attachEvent. In addition, the names of the events are different. For instance, IE uses events such as “onmousemove”, “onmouseup”, but the other browsers omit the “on” and name these events “mousemove” and “mouseup”.
Curiously, Opera is the only browser to support both styles.
The simplest and safest way of working out which one to use is simply to test for the existence of a function called addEventListener. I quite like this method because it works on the latest version of the big four browsers, and IE 6, without having to do any browser version probing.
For instance, here is how to add focus and focus lost events to a page in a way that will work on all modern browsers:
[Javascript]
if (window.addEventListener != null)
{ // Method for browsers that support addEventListener, e.g. Firefox, Opera, Safari
window.addEventListener(“focus”, FocusFunction, true);
window.addEventListener(“blur”, FocusLostFunction, true);
}
else
{ // e.g. Internet Explorer (also would work on Opera)
window.attachEvent(“onfocus”, FocusFunction);
document.attachEvent(“onfocusout”, FocusLostFunction); //focusout only works on document in IE
}
[/Javascript]
This is how to add mouse events:
[Javascript]
if (document.addEventListener != null)
{ // e.g. Firefox, Opera, Safari
document.addEventListener(“mousemove”, MouseMoveFunction, true);
document.addEventListener(“mouseup”, MouseUpFunction, true);
}
else
{ // e.g. Internet Explorer (also would work on Opera)
document.attachEvent(“onmousemove”, MouseMoveFunction);
document.attachEvent(“onmouseup”, MouseUpFunction);
}
[/Javascript]
To remove the mouse events, I recommend…
[Javascript]
if (document.removeEventListener != null)
{ //e.g. Firefox, Opera, Safari
document.removeEventListener(“mousemove”, MouseMoveFunction, true);
document.removeEventListener(“mouseup”, MouseUpFunction, true);
}
else
{ //e.g. Internet Explorer (also would work on Opera)
document.detachEvent(“onmousemove”, MouseMoveFunction);
document.detachEvent(“onmouseup”, MouseUpFunction);
}
[/Javascript]
I personally pray there comes a time when these kinds of workarounds are not required. In the mean time, this will have to do.
Scraping text from Wikipedia using PHP
Posted by jimblackler on Sep 25, 2007
Wikipedia has grown from one of many interesting websites to being one of the most famous sites on the Internet. Millions of volunteer years have been invested over the years, and the pay off is what we have today – a wealth of factual data in one place.
When Wikis were a new concept, many predicted they would descend into chaos as they grew. In the case of Wikipedia the reverse is true. It seems to become increasingly well organised as the site develops. Rather than becoming more jumbled, the natural development of article conventions and the more planned use of standardised templates has created an increasingly neat and consistent structure.
This careful organisation of the prose leads to the interesting possibility of extracting more structured data from Wikipedia for alternative purposes, while staying true to the letter and spirit of the GFDL under which the material is licensed.
There’s the potential for a kind of semantic reverse engineering of article content. HTML pages could be scraped, and pages scoured for hints as to the meaning of each text fragment.
Applications could include loading articles about a variety of subjects into structured databases. Subjects for this treatment could include countries, people, chemical elements, diseases, you name it. These databases could then be searched by a variety of applications.
I’ve knocked up a simple page that gives a kind of quasi-dictionary definition when a word is entered. It looks at the first sentence of the Wikipedia article, which typically describes the article topic concisely.
I’ll show here how the basic page scrape works, which is actually very easy with PHP, its HTML reading abilities and the power of xpath.
- $html = @file_get_contents(“http://en.wikipedia.org/wiki/France”); will pull down the HTML content of the Wikipedia article on France.
- $dom = @DOMDocument::loadHTML($html); will read the HTML into a DOM for querying.
- $xpath = new domXPath($dom); will make a new xpath query.
- $results = $xpath->query(‘//div[@id=”bodyContent”]/p’); will find the first paragraph that is a direct child of the div with the id “bodyContent”. This is where the article always starts in a Wikipedia article page.
I then perform some more processing on the results including contingencies for if any of the steps fail. For instance to make the definitions snappier reading I strip any text in brackets, either round or square. There’s also some additional logic to pick the first topic in the list if the page lists multiple subjects (a “disambiguation” page). Predicting the Wikipedia URL for a given topic also involves a small amount of processing.Anyway, when you ask the page “what is France”, it will reply..
France, officially the French Republic, is a country whose metropolitan territory is located in Western Europe and that also comprises various overseas islands and territories located in other continents.
Can’t argue with that!
Edit, 1st March: By request, here is the source of the WhatIs application. It will work in any LAMP environment but the .sln file is for VS.PHP under Visual Studio 2005.
Overriding the backspace key using JavaScript, in Firefox, IE, Opera and Safari
Posted by jimblackler on Sep 21, 2007
In my web wordgame Qindar.net I wanted to allow the players to use the keyboard to place words on the game board. This included use of the arrow keys to navigate, and the backspace key to ‘delete’ wrongly placed letters.
The problem is that even when this is handled in JavaScript, most browsers still catch the backspace key and interpret it as a user request to go back to the previous page. Boom! There goes your game page, and one annoyed user.
I did find a way of masking the backspace key that works in all the browsers I have tested it against. The trick for most browsers is to override the onkeydown event, check for event number “8” and return ‘false’ from that event. This signals to the browser not to process that key.
As often happens one particular browser is troublesome, in this case it was Opera, that needed “onkeypress” overriding rather than “onkeydown”.
Yesterday I had an email query recently asking how this was done so I’ve detailed it here.
There’s a demo here. Select ‘View Source’ in your browser to see how it’s done.
- <!DOCTYPE html PUBLIC "-//W3C//DTD XHTML 1.0 Transitional//EN" "http://www.w3.org/TR/xhtml1/DTD/xhtml1-transitional.dtd">
- <html xmlns="http://www.w3.org/1999/xhtml" >
- <head>
- <title>Backspace Browser Trap Demo</title>
- </head>
- <body>
- <p>Try pressing backspace on this page.</p>
- <p>Note you can still go 'back' with Alt + Left</p>
- <p id="keypressed"></p>
- <script type="text/javascript" language="javascript">
- // function to possibly override keypress
- trapfunction = function(event)
- {
- var keynum;
- if (window.event) // eg. IE
- {
- keynum = window.event.keyCode;
- }
- else if (event.which) // eg. Firefox
- {
- keynum = event.which;
- }
- if (keynum == 8) // backspace has code 8
- {
- document.getElementById("keypressed").innerHTML = "Backspace pressed";
- // display a message
- return false;
- // nullifies the backspace
- }
- return true;
- }
- document.onkeyup = function(event)
- {
- document.getElementById("keypressed").innerHTML = ""; // clear the message
- return true;
- }
- document.onkeydown = trapfunction; // IE, Firefox, Safari
- document.onkeypress = trapfunction; // only Opera needs the backspace nullifying in onkeypress
- </script>
- </body>
- </html>
Developing LAMP applications on a Windows PC
Posted by jimblackler on Sep 13, 2007
If you’re developing web applications for inexpensive hosting there’s really only one option. LAMP stands for Linux, Apache, MySQL and PHP. It represents a set of technology that’s reliable, battle-tested and totally ubiquitous in the world of web hosting.
Bit like lots of developers you might be working on a Windows computer, using Microsoft software like Visual Studio. This doesn’t feel like the most natural environment for developing for a LAMP setup. There’s a definite draw towards IIS, ASP and MSSQL, the Microsoft alternative to LAMP. This Microsoft tech has a different set of strengths to LAMP, but look for compatible hosting and you’ll find it’s typically twice the cost.
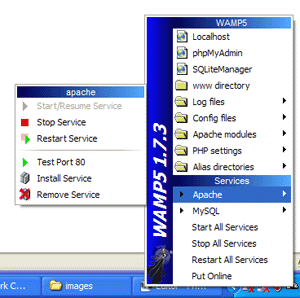
Fortunately you can and it’s not too difficult if you know what to install. A great free package called WampServer will set up and integrate Apache, MySQL and PHP in one go. What’s WAMP? It’s Windows Apache MySQL PHP. The bastard lovechild of two different schools of technology? Or a pragmatic way of combining the most common hosting technology with the most common desktop technology. You decide.
WampServer is ideal for developing on Windows before uploading your site to your Linux-based host. WAMP also comes with some nice configuration menus and the phpMyAdmin web console for MySQL. Get it here, and you can get started by putting the following index.php file in c:\wamp\www and pointing your browser at http://localhost.
<?php echo "hello world"; ?>
Visual Studio
How about using Visual Studio to develop and debug? I can recommend a product called VS.PHP that allows development of PHP applications within Visual Studio. It’s commercial, but it’s relatively cheap and there’s also a free trial available here. VS.PHP has its own Apache service and works very nicely out of the box. However you can configure the system to use WAMP’s Apache if you want to run your application alone or with other tools such as Dreamweaver.
Once you’ve installed VS.PHP and set up a project, this is how to set up debugging to use WAMP 1.7.3. These instructions assume that you store the project files and Visual Studio project files in a location such as c:\wamp\www\myproject, where myproject is the name of your project.
- Download the php_dbg modules.
- Copy the version for PHP 5.2.4. to C:\wamp\php\ext and rename it to php_dbg.dll.
- In the WAMP system tray menu select PHP setting, PHP extensions, Add extension, and type php_dbg.dll.
- From the WAMP menu Select Config files, and then php.ini.
- Put the following lines at the bottom of your php.ini:
- Under the Resource Limits section of php.ini change memory_limit = 8M for memory_limit = 32M. (Debugging needs more memory).
- Save your modified php.ini and restart WAMP from the system try menu.
- In the properties of your VS.PHP project, select Debug then change Debug mode to External mode.
- Change the Start Url to http://localhost/myproject/index.php, changing myproject to the name of your project.
[debugger]

debugger.enabled = true

debugger.profiler_enabled = true

debugger.JIT_host = clienthost

debugger.JIT_port = 7869
You should now be able to set breakpoints and step through your WAMP-based PHP applications with Visual Studio.
Design
Adobe Dreamweaver is a very popular package for web design and also offers some nice visual tools to create simple data enabled pages. Unfortunately it defaults to use IIS on Windows. However if you’ve installed WAMP you can configure Dreamweaver to use its services. Combined with the previous approach this will give you a combined LAMP-ready debugging and design environment on a Windows computer. These instructions are for Dreamweaver CS. Again, I assume that you store the website files in a location under c:\wamp\www such as c:\wamp\www\myproject.
- Select Manage Sites
- In the HTTP Address box type http://localhost/myproject/index.php, changing myproject to the name of your project.
- Select Next, and under the server technology select PHP MySQL.
- Select Edit and Test locally.
- Under the file location type C:\wamp\www\myproject\ (again, changing myproject ).
- Select Next. Under the Root URL type http://localhost/myproject/ (again, changing myproject ).
- Select Next twice, and then Done.
In Dreamweaver you can make use of the WAMP MySQL service to develop MySQL integrated Recordsets. You can also make use of the simple wizards in Dreamweaver to create HTML/PHP/MySQL log in services. Use the phpMyAdmin web admin under WAMP to set up a database, tables and a user for Dreamweaver to connect to. Then copy these details – alongside “localhost” as the MySQL server – in the Recordset configation windows in Dreamweaver.
In conclusion
So that’s it. You should be good to go for LAMP development on your Windows PC. Remember that your host is likely to have a different configuration of Apache and PHP with different versions, modules enabled and so on. Fortunately WAMP makes it quite easy to configure your local setup to match your host. Also look out for the fact that Windows isn’t cASe SenSItiVE at all on filenames, and this extends to Web hosting. Linux services generally are case sensitive by default. So if the live version of your application has problems locating files, that might be why.
Happy WAMPing!
